NetScaler Ciphers and the ROBOT Attack

Here we are again with another Vulnerability related to the SSL/TLS Ecosystem called the ROBOT Attack (robotattack.org) and that usually means the NetScaler is also affected or you need to change some part of your SSL/TLS Configuration.

Besides updating your NetScaler Firmware to one of the latest Builds (see CTX230238 for fixed Builds) you need to remove all Ciphers starting with TLS_RSA from your Cipher List. Below is a Cipher List where all the Ciphers with RSA Encryption are removed to prevent the ROBOT Attack.

You could alternatively also use the Modern Compatibility Cipher List:


https://docs.citrix.com/en-us/receiver/windows/4-7/configure/ica-import-icaclient-template-v2.html

Important Note: Only Citrix Receivers for Windows starting with Version 4.7 or higher can connect to your published Desktops/Applications after applying the new Cipher List. This is because ECDHE Cipher Support was first implemented with Receiver 4.7 and we have removed all the other supported Ciphers starting with TLS_RSA_*.

You can see a List of supported Ciphers for the Citrix Receiver starting with Version 4.7 below: 

https://docs.citrix.com/en-us/receiver/ios/7/secure-communications.html

Update #1: I had to learn the hard way that the Citrix iOS Receiver 7.4 can't work with the posted Cipher Lists because the iOS Receiver only supports Ciphers starting with TLS_RSA_*.

Hopefully Citrix will soon release a new Version with additional Cipher Support.

Update #2: The Problem with the Citrix iOS Receiver has been fixed in the 7.5 Version. You can now use the new Cipher List with the latest iOS and Android Receivers.


Verification:

As always test your updated Configuration with the SSLLabs Test or use the Comodo SSL Analyzer.

Feedback and Comments is as always very welcome.

NetScaler Cipher Lists - 2017 Edition with ChaCha20 Support

Citrix did release a new NetScaler Release/Firmware in December 2017 with Support for a subset of the ChaCha20 Ciphers, so that means I had to update my Cipher Lists. The NetScaler Firmware starting to support ChaCha20 is 12.0-56.20 and this time the ChaCha20 Ciphers are only supported on VPX Appliances. Let's hope that Citrix will add MPX Support and the Rest of the ChaCha20 Ciphers in a subsequent NetScaler Release.

So here are the updated Cipher Groups:

  • Modern Compatibility:
  • Intermediate Compatibility:

Currently the Intermediate Cipher Group is still vulnerable to the ROBOT Attack because of the Ciphers starting with TLS_RSA. I suggest using the Modern Compatibility Cipher Group to remediate against the ROBOT Attack.

OCSP Stapling and NetScaler 11.1+

Starting with NetScaler 11.1 Build 51.21 the NetScaler now supports OCSP Stapling. Yay!

For more in-depth Information about OCSP Stapling and why you should enable it I recommend reading Scott Helme's Blogpost about OCSP.

But let's get started on how to configure the NetScaler to enable OCSP Stapling (the GUI way).

Requirements

  • NetScaler 11.1  Build 51.21 or later
  • Outbound Firewall Rule to allow the NetScaler Subnet IP (SNIP) to communicate with the External OCSP Responder on Port 80 (HTTP).
  • Existing SSL/TLS Certificate with embedded OCSP Extension (AIA Extension)
  • Working DNS Resolution on NetScaler for "external" URLs

Configuration

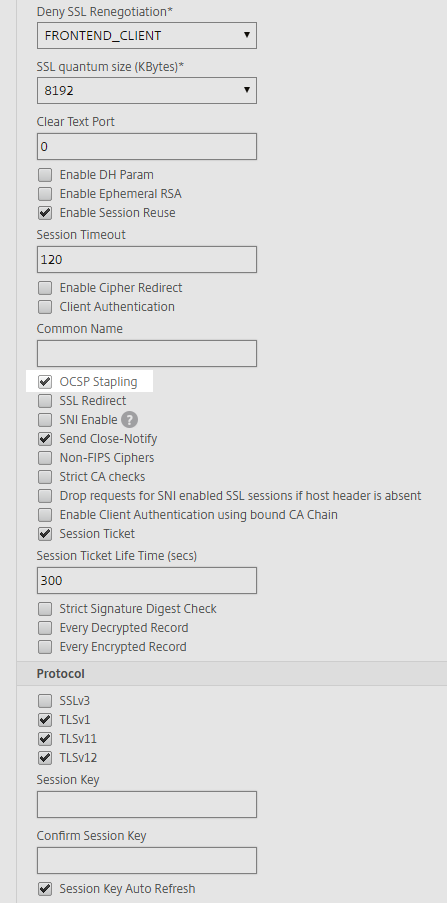
First thing is we need to enable the OCSP Stapling Feature on the SSL Profile in case you are using SSL Profiles or the SSL Default Profiles to configure your SSL/TLS Settings. Otherwise you have to enable the OCSP Stapling Feature in the SSL Parameters for every vServer.

You can find it in the GUI under System -> Profiles -> SSL Profile:

2018-01-10 13_10_56.png

You can choose to create a new SSL Profile (FrontEnd) or edit one of the existing ones, for example the ns_default_ssl_profile_frontend Profile. In my example I'm editing the ns_default_ssl_profile_frontend Profile and enabled the OCSP Stapling checkmark and afterwards saved the Configuration.

2018-01-09 12_47_45.png

Next Step is to create a new OCSP Responder. After upgrading to the latest NetScaler Build you will notice that there are one (or more) OCSP Responders automatically generated with the INTERNAL_ Prefix when checking under Traffic Management -> SSL -> OCSP Responder.

2018-01-09 12_50_17.png

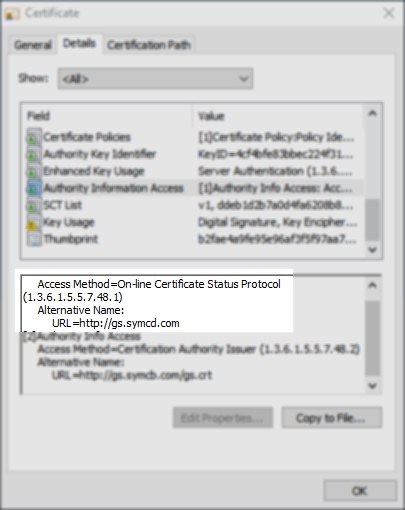
These are generated automatically for every OCSP URI found in the Certificates currently imported into the NetScaler. In my Example I'm using a Certificate from RapidSSL (GeoTrust) which is owned by Symantec and hence the *.symcd.com OCSP URI.

You can check the OCSP URL by looking at your Certificate under the AIA Extension.

2018-01-10 12_19_36.png

You can't edit the auto-created INTERNAL_ OCSP Responders so I opted to "duplicate" the INTERNAL_ OCSP Responders and create new ones where I configured some specific Settings.

2018-01-09 12_50_41.png

I disabled the "Nonce" Checkmark and checked the "Trust Responses" Option.

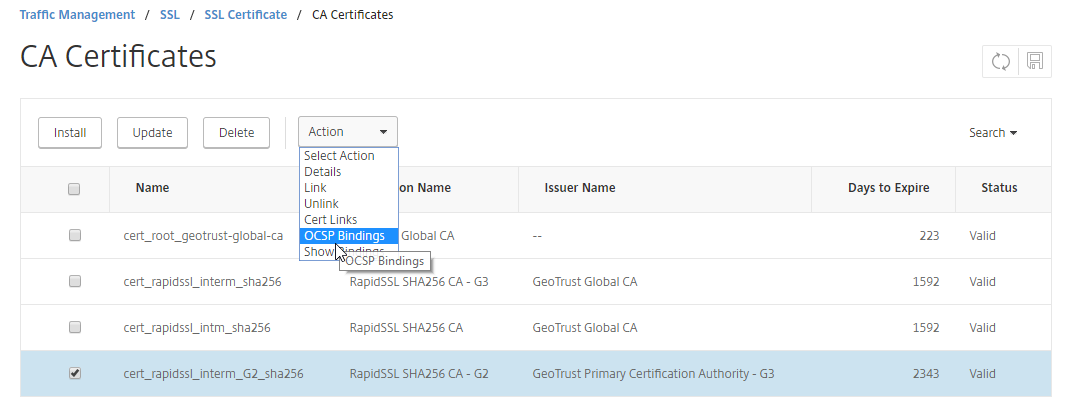
After saving your new OCSP Responder we need to bind it to the CA Intermediate Certificate (not the SSL/TLS Certificate) which issued your SSL/TLS Certificate. Navigate to Traffic Management -> SSL -> Certificates -> CA Certificates and bind the newly created OCSP Responder to the Intermediate CA Certificate.

2018-01-09 12_51_36.png
2018-01-09 12_51_51.png

Last Step to configure is to bind the SSL Profile with enabled OCSP Stapling to your vServer. Or enable the OCSP Stapling Option under SSL Parameters if you are not using SSL Profiles / SSL Default Profiles.

2018-01-09 12_52_33.png

Check your Configuration

Last Step is to check if OCSP Stapling is working as intended. You can use SSLLabs, Comodo SSL Analyzer or OpenSSL CLI to check it. 

Comodo CA SSL Analyzer:

2018-01-09 12_55_17.png
2018-01-09 12_57_10.png

OpenSSL: (Command: openssl s_client -connect example.com:443 -tlsextdebug -status)

Troubleshooting:

If none of the Test Tools are reporting the successful OCSP Stapling Support make sure to check that the NetScaler can reach the OCSP Responder on Port 80 (via HTTP) through a possible Firewall. The Traffic should originate from the Subnet IP Adress (SNIP) or NetScaler IP (NSIP).

Also make sure that the NetScaler can resolve the OCSP URI and that the DNS Resolution is working. As most (if not all) Public CAs are using a Content Deliver Network (CDN) for their OCSP Responders configuring a OCSP Responder with a IP is not recommended because the IPs on CDNs might change quite often.

From the NetScaler BSD Shell (not the NetScaler CLI) you can run the following Command which could indicate where the Problem lies: nsconmsg -d stats | grep ocsp

The Counter ssl_err_ocsp_http_callout_failed for example could indicate a Problem reaching the OCSP Responder because of Firewall Problems.

Blogpost Changelog:

#1 - 09.01.2017 - Initial Draft
#2 - 13.01.2017 - added Troubleshooting Command for OCSP Counters

NetScaler Cipher Lists - 2016 Edition with ECC/ECDSA

The new NetScaler 11.1 Release (starting with Build 47.14) brings Support for ECC/ECDSA Ciphers, unfortunately only on MPX Appliances with a N3 SSL Accelerator Chip for now.

Next on my Wish List would be ECC/ECDSA Support on VPX/CPX, OCSP Stapling and ChaCha20-Poly1305 Support.

The new updated Cipher Lists are grouped into a Modern and a Intermediate Cipher List Group based on the Recommendations from the Mozilla Wiki. If you want to use the Intermediate Cipher List don't forget to create a 2048bit DH Parameter and bind it to your vServer (or your SSL Profile).

  • Mozilla Modern:
Oldest Supported Clients: Firefox 27, Chrome 30, IE 11 on Windows 7, Edge, Opera 17, Safari 9, Android 5.0, Java 8
TLS Versions: TLS1.2 only

  • Mozilla Intermediate:
Oldest Supported Clients: Firefox 1, Chrome 1, IE 7, Opera 5, Safari 1, Windows XP IE8, Android 2.3, Java 7
TLS Versions: TLS1.0, TLS1.1 TLS1.2


After the Break are the Cipher Lists from my older Blogposts for Reference if you are running an older Version:


Cipher List for MPX/SDX and VPX (starting with Build 11.0-65.31) Appliances:

Legacy Cipher List for MPX/SDX and VPX (starting with Build 11.0-65.31) Appliances:

Cipher List for VPX starting from Build 10.5-57.7 up to 11.0-64.34:

Legacy Cipher List for VPX Builds starting from Build 10.5-57.7 up to 11.0-64.34:

Public Key Pinning (HPKP) with NetScaler

I recently decided to implement HTTP Public Key Pinning (HPKP) for some of our external facing Services and our NetScaler Gateway/Access Gateway.

Before we go on I recommend reading through the Wikipedia Article and this Blogpost from Tim Taubert to get a basic understanding of how HPKP works. Tim can also explain it a lot better than I can.

In this Guide I'm assuming you already have some kind of Load balancing vServer or NetScaler Gateway set up and running (including an existing SSL Certificate). So let's start:

In my Example I choose to pin the used Certificate itself and the Intermediate Certificate from RapidSSL where the Certificate itself was issued from. Please make sure you know the consequences when choosing the Certificate Hashes you are going to pin.

First off we need to generate the SHA256 Hashes for the Certificates we want to "pin". I choose to do it via the OpenSSL Interface in the NetScaler GUI but you could also choose to do the same via the NetScaler Shell CLI.

Just copy and paste the following Command into the Command Window and let OpenSSL do its magic. Copy or write down the created Hash as we will need it later on.

x509 -in /nsconfig/ssl/name-of-your-servercertificate.cer -pubkey -noout | openssl rsa -pubin -outform der | openssl dgst -sha256 -binary | openssl enc -base64

Rinse and repeat for the second Certificate (the Backup Hash) you want to pin. In my case this is the issuing Intermediate Certificate from RapidSSL.

x509 -in /nsconfig/ssl/name-of-your-intermediate.cer -pubkey -noout | openssl rsa -pubin -outform der | openssl dgst -sha256 -binary | openssl enc -base64

Next up we need to create the Rewrite Action and the Rewrite Policy to insert the needed HPKP HTTP Header into the HTTP Responses for our vServers and/or NetScaler Gateways.

First lets create a Rewrite Action. I named mine "insert_HPKP_header":

Name: insert_HPKP_header
Type: INSERT_HTTP_HEADER
Header Name: Public-Key-Pins
Expression: "pin-sha256=\"yourcerthashgoeshere\"; pin-sha256=\"yourbackuphashgoeshere\"; max-age=60; includeSubDomains"

Important: For the max-age I recommend starting with a low Value like 60 seconds during the Implementation Phase because if you somehow fuck up your Hashes you are only locked out for 60 Seconds. After successfully testing your HPKP Headers you should then ramp it up to something like 5184000 seconds.

Next Step is to create the needed Rewrite Policy itself. Mine is called enforce_HPKP and is just using TRUE as Expression.

Now its time to bind the newly created Rewrite Policy onto the vServer and/or the NetScaler Gateway Server. If you have multiple Rewrite Actions with different Priorities bound to the vServer (like in my case) make sure to set the "Goto Expression" Option to NEXT or otherwise only the first Rewrite Action will be applied. 

Last but not least you should check if the Public-Key-Pins Header is added successfully to your HTTP Responses. An easy Way is using the SSLLabs.com Scanner and check the Public Key Pinning Test. If everything is working you can now ramp up the max-age Value to 5184000.

If you don't like the NetScaler GUI you can also use the following CLI Commands to implement it:

add rewrite action insert_HPKP_header insert_http_header Public-Key-Pins q{"pin-sha256=\"yourcerthashgoeshere\"; pin-sha256=\"yourbackuphashgoeshere\"; max-age=60; includeSubDomains"} 
add rewrite policy enforce_HPKP TRUE insert_HPKP_header
bind vpn vserver nameofyourvserver -policy enforce_HPKP -priority 100 -gotoPriorityExpression END -type RESPONSE

Update: Implement HPKP Reporting

HPKP includes a Reporting Functionality for the Clients (Browsers) to send a Report in case of an Error. There is a great and free Service called report-uri.io from Scott Helme you can use to avoid having to set up your own Report Server.

After registering at report-uri.io you are given a unique Report URL you have to add to the HTTP HPKP Header as an additional Parameter. In this Example we would use the Public-Key-Pins-Report-Only Header (instead of the Public-Key-Pins Header) without enforcing HPKP itself. This would be a good first Step to see if your calculated Certificate Hashes in the Header are correct without blocking your Site in case of a wrong Hash.

Name: insert_HPKP_header_reportonly
Type: INSERT_HTTP_HEADER
Header Name: Public-Key-Pins-Report-Only
Expression: "pin-sha256=\"yourcerthashgoeshere\"; pin-sha256=\"yourbackuphashgoeshere\"; max-age=60; includeSubDomains; report-uri=\"https://report-uri.io/report/667d4f42bdc27b357863fefdd41574a4\""

The CLI Command for creating the would be

add rewrite action insert_HPKP_header_reportonly insert_http_header Public-Key-Pins-Report-Only q{"pin-sha256=\"yourcerthashgoeshere\"; pin-sha256=\"yourbackuphashgoeshere\"; max-age=2592000; includeSubDomains; report-uri=\"https://report-uri.io/report/667d4f42bdc27b357863fefdd41574a4\""}
add rewrite policy enable_HPKP_Reporting TRUE insert_HPKP_header_reportonly
bind vpn vserver nameofyourvserver -policy enable_HPKP_Reporting -priority 100 -gotoPriorityExpression END -type RESPONSE 

 As always Feedback and Comments are greatly appreciated.