Implementing the Expect-Staple Header on NetScaler

Since my old Blogpost regarding the various HTTP Security Headers got a lot of Traffic I decided to write a new Post because since then there are now two more major HTTP Headers worth considering.

The first one is Expect-Staple and the other one is Expect-CT. As with all the other HTTP Security Headers I recommend reading Scott Helme's Blog explaining all the finer Details of those two Headers (Expect-Stapling and Expect-CT).

But this Blogpost is all about the Expect-Staple Header, so let's get cracking.

Requirements:

Before deploying the Header you should have configured OCSP Stapling on the vServer you are going to bind the new Header to or you will get a lot of Reports to your Reporting URL. And speaking of a Report URL you should have a Service where to send those Reports in case the Expect-Staple Header is being triggered. I can recommend report-uri.com if you need one.

Implementation:

Currently there is no enforce Directive for the Expect-Staple Header so you can't break your Site by accidentally deploying a wrong Header Value like you could do with the HPKP Header. The Expect-Staple Header is basically a Report-Only Header (for now).

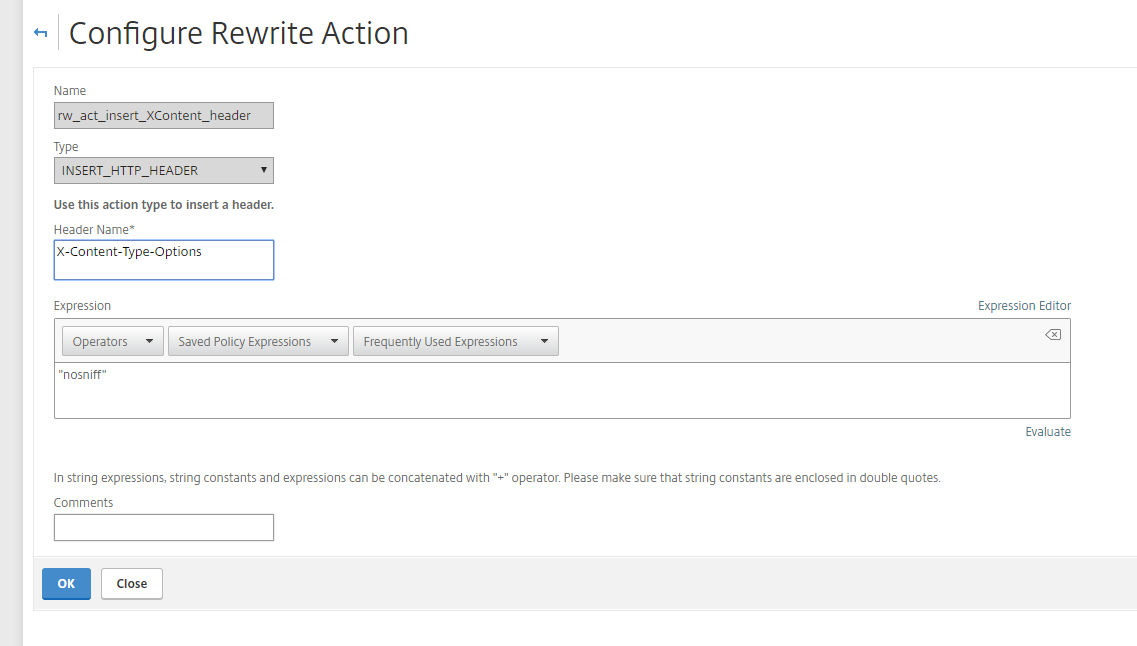
  • As with all other Headers we start by creating a new Rewrite Action and a Rewrite Policy. Create the Expect-Staple Action as seen in the Screenshot below:
Name: rw_act_insert_Expect-Staple_header
Type: INSERT_HTTP_HEADER
Header Name: Expect-Staple
Expression: "max-age=0; report-uri=https://example.report-uri.com/r/d/staple/reportOnly; includeSubDomains; preload"
  • Next up is the Expect-Staple Rewrite Policy:
Name: rw_pol_enforce_Expect-Staple_Reporting
Action: rw_act_insert_Expect-Staple_header
Expression: TRUE
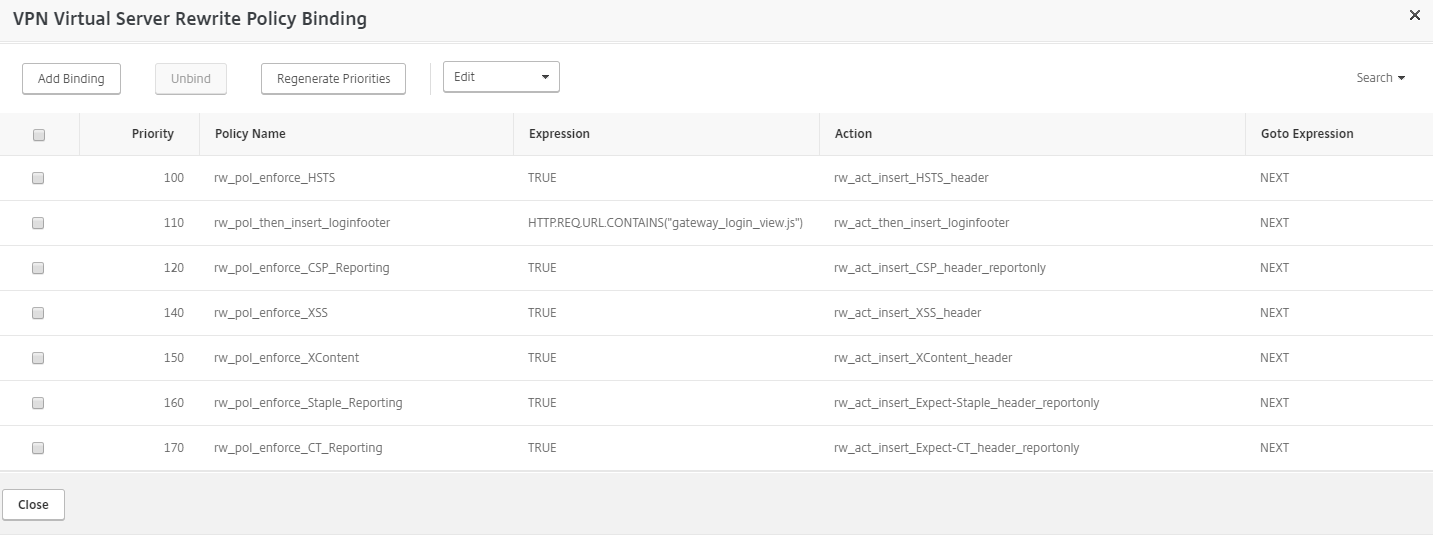
  • And as a last Step you need to bind the new Rewrite Policy to your NetScaler Gateway/Content Switching vServer or Load Balancing vServer where you want to deploy the new Header.

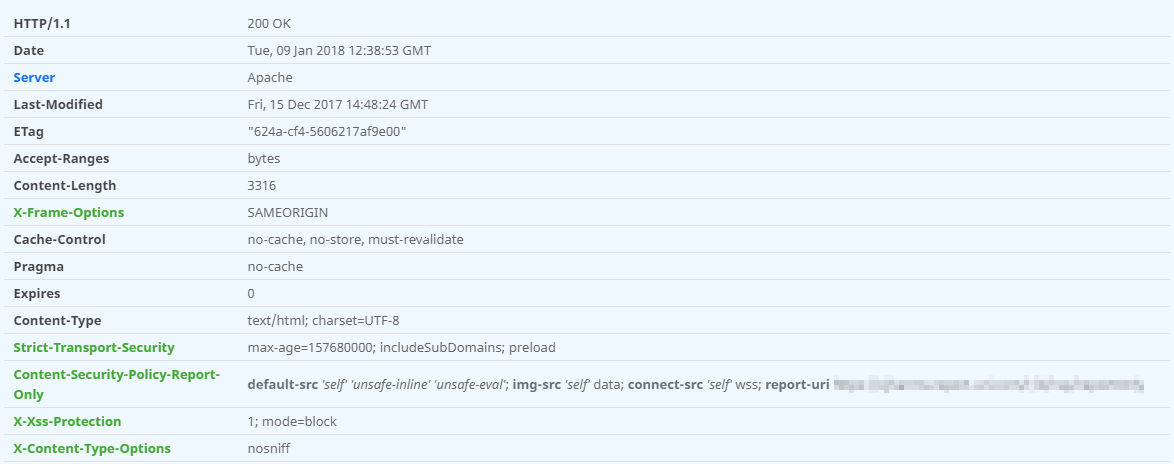
You can check the correct Implementation with the securityheaders.io Test. It should look something like this:

Congratulations, another Header deployed! Now you should receive Reports (to your Report URI) whenever something went wrong with the OCSP Stapling when someone visits your vServer. If your OCSP Stapling Implementation (in our case the Stapling Implementation of the NetScaler) proves to be staple you can think about requesting a Certificate with the new OCSP Must-Staple Extension but thats reserved for another Blogpost.

Comments and Feedback is as always welcome. I would be especially interested if you are already using the OCSP Stapling Implementation and your Experiences with it.

NetScaler and additional HTTP Security Headers

After bringing the SSL/TLS Cipher Suites Setup up to date on our NetScalers it's now time to take a closer look at a few of those HTTP Security Headers (X-Xss-Protection, X-Frame-Options and X-Content-Type-Options) and how to implement them on the NetScaler ADC. For an in depth Explanation what those different Headers really do I will refer you to the excellent Blog from Scott Helme who can explain those Things a lot better than me.

So if you are fronting your Webservers with a NetScaler or you want to enhance the Security of your NetScaler Gateway (formerly also known as Citrix Access Gateway) you might want to implement those HTTP Headers on the NetScaler itself and not directly on your Webservers.

The following Guide and Screenshots were written/taken while using the NetScaler 11.0-63.16.nc Firmware and using the GUI. If you prefer the CLI, all of the needed Commands for adding the 3 Rewrite Rules can be found at the end of the Blogpost.

Enough talk, lets begin:

  • We will create a new Rewrite Action for inserting the X-Frame-Options Header in the GUI under AppExpert -> Rewrite -> Actions -> Add.

Next we will choose a Name for the new Rewrite Action and then select "INSERT_HTTP_HEADER" as the Type. Under Header Name we need to put X-Frame-Options and under Expression we will put "SAMEORIGIN" or "DENY" (depending on your Use Case).

2018-01-09 13_36_04.png

In the next Step we need to create the Rewrite Policy itself in the GUI under AppExpert -> Rewrite -> Policies -> Add. Name the Policy accordingly and under Action select the Rewrite Action we created a Step earlier. As Expression you can use TRUE which will force the NetScaler to always insert the HTTP Header as long as the Policy is being hit/used.

2018-01-09 13_36_46.png

Next Step is to bind the newly created Rewrite Policy to the vServer (or NetScaler Gateway) of your choice. In my example I'm binding it to one of our NetScaler Gateways as a new Response Policy.

2018-01-09 13_37_54.png

Important: If you already have existing Rewrite Policies bound to your vServer and you want them all applied make sure only the last Rewrite Policy (with the highest Priority Number) is using END as the Goto Expression or NetScaler will stop applying your Policies as soon as he hits the first Rewrite Policy with an END Goto Expression.

Reminder: NetScaler is going through those Policies from the lowest to the highest Priority Number and depending on the GoTo Expression after starting with the lowest Policy will either continue (Goto Expression: NEXT) with the next higher Policy or just stop going through all of the remaining Policies (Goto Expression: END).

Now it's time to check if we did everything correctly and if all our existing and new Rewrite Policies are still being applied. If your Website (where we bound the new Rewrite Policy) is publicly available you can use the securityheaders.io Site to check if the new HTTP Header is present (note the green X-Frame-Options Badge in the Screenshot). Otherwise you would need to use the "Developer Tools" of your Browser to check if the HTTP Response Headers are being added.

2018-01-09 13_39_16.png

Now we need to repeat the whole Process for the other 2 HTTP Headers (X-Xss-Protection and X-Content-Type-Options). First we create a new Rewrite Action with the X-Xss-Protection Header Name and the Expression Value set to "1; mode=block"

2018-01-09 13_36_15.png

And a new Rewrite Policy for the corresponding Rewrite Action. Again using TRUE as Policy Expression.

2018-01-09 13_36_54.png

And again bind the newly created Policy. Again, pay attention to your Priority and Goto Expression.

2018-01-09 13_37_54.png

And after binding the Policy and saving the running Config make sure the new Policy is working. We should now also see a green Badge with a Checkmark next to the X-Xss-Protection Header in the Test.

2018-01-09 13_39_16.png

And now onto the last HTTP Security Header X-Content-Type-Options. Again create a new Rewrite Action with the Header Name Value of X-Content-Type-Options and the Expression Value set to "nosniff".

2018-01-09 13_36_26.png

And a new Rewrite Policy with TRUE as Expression Value

2018-01-09 13_37_02.png

As always bind your new Rewrite Policy to your vServer. After binding all 3 new Policies to the vServer it looked like this:

2018-01-09 13_39_16.png

Your 3 new Rewrite Actions and their corresponding Rewrite Policies should now all be listed in the GUI.

2018-01-09 13_37_54.png

And again testing with all 3 new Policies bound it should look something like this in the securityheaders.io Test. Implementing Content Security Policy (CSP) on NetScaler is reserved for another Blogpost in the future.

And here are the CLI Commands for creating the 3 Rewrite Actions and Policies if you really hate the GUI or simply enjoy the CLI:

add rewrite action rw_act_insert_XFrame_header insert_http_header X-Frame-Options "\"SAMEORIGIN\""
add rewrite action rw_act_insert_XSS_header insert_http_header X-Xss-Protection "\"1; mode=block\""
add rewrite action rw_act_insert_XContent_header insert_http_header X-Content-Type-Options "\"nosniff\""
add rewrite policy rw_pol_enforce_XFrame TRUE rw_act_insert_XFrame_header
add rewrite policy rw_pol_enforce_XSS TRUE rw_act_insert_XSS_header
add rewrite policy rw_pol_enforce_XContent TRUE rw_act_insert_XContent_header

Thanks again to Scott Helme for writing the great securityheaders.io Site and for providing a lot of Background on those Headers in his Blogposts.

Feel free to leave a Comment with Feedback or Questions, thanks!